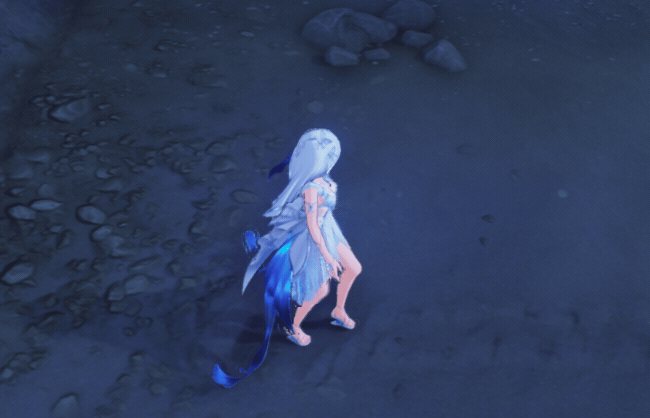
鸣潮中沙地雪地足迹和脚印效果实现
Github源码传送门————>FootPrint_WutheringWaves
Bilibili教程传送门————>为何鸣潮角色脚印都一样?小祥带你实现鸣潮足迹脚印效果
整体思路
从实机画面可以看到,角色在沙地上行走的时候,一方面走过的地方沙地下陷产生一条足迹拖尾,同时在下陷的尾迹上也有清晰独立的脚印。一般理性而言,做脚印的话使用印花是最方便的,在脚踩的地方生成印花即可。但问题是,我们看到鸣潮中的脚印,一方面他有凹凸不平的视觉效果,同时脚印的材质明显是随着地形变化的,如果用印花来做显然不能随时匹配地形材质。既然足迹和脚印二者都与地形(Terrain)相关,那么我们从地形入手。欸↑这不是巧了,地形的实际高度可以通过高度贴图控制,同时也有法线贴图控制表面凹凸效果,那么我们通过修改高度贴图产生地形下陷的效果,同时将脚印的法线贴图叠加到地形的法线贴图上产生和地形相同材质的脚印,岂不是两难自解。
1.更新高度贴图
1
2
3
4
5
6
7
8
9
10
11
12
13
14
15
16
17
18
19
20
21
22
23
24
25
26
27
28
29
30
31
32
33
34
35
36
37
| private void Start()
{
customRT = new CustomRenderTexture(2048, 2048);
customRT.material = terrainTrailHeightMat;
customRT.dimension = TextureDimension.Tex2D;
customRT.format = RenderTextureFormat.R8;
customRT.updateMode = CustomRenderTextureUpdateMode.Realtime;
customRT.doubleBuffered = true;
customRT.Create();
customRT.Initialize();
terrain.materialTemplate = terrainMat;
terrain.materialTemplate.SetTexture("_HeightMap", customRT);
}
private void Update()
{
UpdateTrail();
}
private void UpdateTrail()
{
Ray ray = new Ray(playerTransform.position, Vector3.down);
if (Physics.Raycast(ray, out RaycastHit hitInfo))
{
if (hitInfo.transform.tag.Equals("Ground"))
{
Vector2 hitCoord = hitInfo.textureCoord;
float angle = playerTransform.rotation.eulerAngles.y;
terrainTrailHeightMat.SetVector("_TrialPosition", hitCoord);
terrainTrailHeightMat.SetFloat("_TrailAngle", angle);
}
}
customRT.Update();
}
|
- 因为高度贴图要随着玩家移动随时更新,所以使用CustomRenderTexture(CRT),CRT的优势有:
- 局部更新,可以只对纹理的部分区域执行着色器,而不是每次重绘整个纹理
- 初始化更方便,可以设置初始化材质以及初始化颜色等
- 更新频率可控,通过手动调用Update方法在适当的时机更新贴图
- 支持双缓冲,着色器能同时读取上一次结果并写入新结果,不用维护两个RT反复Blit
- customRT.format = RenderTextureFormat.R8: 高度贴图是灰度图,我们只需要R通道存数据即可
- customRT.doubleBuffered = true 记得开启双缓冲
- hitInfo.textureCoord 以玩家的坐标为起点向下做射线检测,获取当前玩家所在位置对应的uv坐标传入着色器进行处理
2.高度贴图shader
1
2
3
4
5
6
7
8
9
10
11
12
13
14
15
16
17
18
19
20
21
22
23
24
25
26
27
28
29
30
31
32
33
34
35
36
37
38
39
40
41
42
43
44
| Shader "Custom/TerrainHeight"
{
Properties
{
_TrialTexture ("Trial Texture", 2D) = "white" {}
_TrailOffset ("Trial Offset", float) = 0.05
}
SubShader
{
Tags { "RenderType"="Opaque" }
LOD 200
Pass
{
CGPROGRAM
#include "UnityCustomRenderTexture.cginc"
#pragma vertex CustomRenderTextureVertexShader
#pragma fragment frag
sampler2D _TrialTexture;
float _TrailOffset;
float4 _TrialPosition;
float _TrailAngle;
float4 frag(v2f_customrendertexture i) : SV_target
{
float4 oldHeight = tex2D(_SelfTexture2D, i.localTexcoord.xy);
float2 pos = i.localTexcoord.xy - _TrialPosition;
float angle = radians(_TrailAngle);
float2x2 rotMatrix = float2x2(
cos(angle), -sin(angle),
sin(angle), cos(angle));
pos = mul(rotMatrix, pos);
pos = pos / _TrailOffset + float2(0.5, 0.5);
float4 newHeight = tex2D(_TrialTexture, pos);
return min(oldHeight, newHeight);
}
ENDCG
}
}
}
|
- 我们要使用CRT,所以shader中要引入对应的库UnityCustomRenderTexture.cginc,使用已经定义好的顶点着色器CustomRenderTextureVertexShader,以及结构体v2f_customrendertexture
- _SelfTexture2D: 因为我们开启了双缓冲,所以可以拿到缓存的数据
- float2 pos = i.localTexcoord.xy - _TrialPosition: 这一步将全局uv坐标转换到局部坐标后旋转采样获得新的高度值
3.更新脚印法线贴图
1
2
3
4
5
6
7
8
9
10
11
12
13
14
15
16
17
18
19
| void Start()
{
terrainMat = terrain.materialTemplate;
customRT = new CustomRenderTexture(2048, 2048);
customRT.material = footprintMat;
customRT.initializationColor = new Color(0f, 0f, 0f, 0f);
customRT.dimension = TextureDimension.Tex2D;
customRT.format = RenderTextureFormat.ARGB32;
customRT.updateMode = CustomRenderTextureUpdateMode.Realtime;
customRT.doubleBuffered = true;
customRT.Create();
customRT.Initialize();
Vector4[] uvs = Enumerable.Repeat(new Vector4(-1f, -1f, 0f, 0f), 100).ToArray();
footprintMat.SetVectorArray("_FootUVArray", uvs);
terrainMat.SetTexture("_OverlayNormalMap", customRT);
}
|
- 依旧使用CRT,同时开启双缓冲,需要不断叠加脚印贴图到原贴图
- footprintMat.SetVectorArray(“_FootUVArray”, uvs): 后面我们要维护脚印的淡出效果,所以要用数组保存脚印数据,而shader的数组是固定长度的常量缓冲区,所以需要在初始化的时候就传入数组长度
1
2
3
4
5
6
7
8
9
10
11
12
13
14
15
16
17
18
19
20
21
22
| private void CheckPivotWeight()
{
float pivotWeight = animator.pivotWeight;
float tempPivotWeight = Mathf.Abs(pivotWeight - 0.5f);
if (tempPivotWeight > 0.4f && lastPivotWeight < 0.4f)
{
Transform foot = footsTransform[pivotWeight >= 0.5 ? 0 : 1];
Ray ray = new Ray(foot.transform.position, Vector3.down);
if (Physics.Raycast(ray, out RaycastHit hitInfo))
{
if (hitInfo.transform.tag.Equals("Ground"))
{
Vector2 hitCoord = hitInfo.textureCoord;
float angle = animator.transform.parent.rotation.eulerAngles.y - 90f;
footPrintDatas.Add(new FootPrintData() { uv = hitCoord, angle = angle, startTime = Time.time });
}
}
}
lastPivotWeight = tempPivotWeight;
}
|
- 同理要以两只脚为起点,向下做射线检测,获取脚踩的地方的uv坐标。同时维护脚印生成时间到脚印数据,后续需要不断刷新脚印
- float pivotWeight = animator.pivotWeight: 这里使用锚点权重或者说重心权重(pivotWeight)判断哪个脚落地,在脚落地后进行射线检测会让脚印的位置更准确
1
2
3
4
5
6
7
8
9
10
11
12
13
14
15
16
17
| private void UpdateFootPrintDatas()
{
float curTime = Time.time;
footPrintDatas = footPrintDatas.Where(p => curTime - p.startTime < (showTime + fadeOutTime)).ToList();
int count = footPrintDatas.Count;
if (count <= 0) return;
List<Vector4> datas = new List<Vector4>();
for (int i = 0; i < count; i++)
{
float duration = curTime - footPrintDatas[i].startTime < showTime ? 1f : 1 - (curTime - footPrintDatas[i].startTime - showTime) / fadeOutTime;
datas.Add(new Vector4(footPrintDatas[i].uv.x, footPrintDatas[i].uv.y, duration, footPrintDatas[i].angle));
}
footprintMat.SetInt("_FootprintCount", count);
footprintMat.SetVectorArray("_FootUVArray", datas);
}
|
- 维护脚印数据,可以看到我们使用**_FootUVArray**这样一个Vector4参数传递脚印数据,xy是uv坐标,z是脚印的透明度,w是脚印的旋转角度,四个分量对应不同信息,物尽其用
4.脚印法线贴图shader
1
2
3
4
5
6
7
8
9
10
11
12
13
14
15
16
17
18
19
20
21
22
23
24
25
26
27
28
29
30
31
32
33
34
35
36
37
38
39
40
41
42
43
44
45
46
47
48
49
50
51
52
53
54
55
56
57
58
59
60
61
62
63
64
| Shader "Custom/FootPrint"
{
Properties
{
_FootprintNormal ("Normal", 2D) = "bump" {}
_FootprintMask ("Mask", 2D) = "white" {}
_FootUV ("UV Position", Vector) = (0, 0, 0, 0)
_FootprintScale ("Footprint Scale", float) = 0.01
}
SubShader
{
Pass
{
Tags { "RenderType"="Opaque" }
LOD 200
CGPROGRAM
#include "UnityCustomRenderTexture.cginc"
#pragma vertex CustomRenderTextureVertexShader
#pragma fragment frag
#define MAX_FOOTPRINTS 100
sampler2D _FootprintNormal;
sampler2D _FootprintMask;
int _FootprintCount;
float4 _FootUVArray[MAX_FOOTPRINTS];
float _FootprintScale;
float4 frag(v2f_customrendertexture i) : SV_Target
{
float4 encodedNormal = float4(0, 0, 0, 0);
for(int idx = 0; idx < _FootprintCount; idx++)
{
float2 center = _FootUVArray[idx].xy;
float2 delta = i.localTexcoord.xy - center;
float angle = radians(_FootUVArray[idx].w);
float2x2 rotMatrix = float2x2(
cos(angle), -sin(angle),
sin(angle), cos(angle));
delta = mul(rotMatrix, delta);
if (abs(delta.x) > _FootprintScale || abs(delta.y) > _FootprintScale)
continue;
float2 localUV = delta / _FootprintScale / 2 + 0.5;
if(tex2D(_FootprintMask, localUV).r < 0.5)
continue;
float3 decalNormal = UnpackNormal(tex2D(_FootprintNormal, localUV));
float fade = _FootUVArray[idx].z;
encodedNormal.rgb = decalNormal * 0.5 + 0.5;
encodedNormal.a = fade;
}
return encodedNormal;
}
ENDCG
}
}
}
|
- 依旧同理,对传入的脚印数据进行坐标转换旋转之后对脚印的法线贴图进行采样
- float3 decalNormal = UnpackNormal(tex2D(_FootprintNormal, localUV)) 需要注意我们处理的贴图是法线贴图,Unity在导入法线贴图的时候会把法线从线性空间(-1,+1)映射到颜色通道(0,1),所以需要先解码(UnpackNormal)然后进行处理
- encodedNormal.rgb = decalNormal * 0.5 + 0.5 当然法线数据处理完后也要编码回去
- encodedNormal.a = fade 法线贴图的a通道用来存脚印的透明度,后续和地形的法线贴图混合的时候会用到
5.自定义地形材质shader
1
2
3
4
5
| void vert(inout appdata_full v)
{
float offset = tex2Dlod(_HeightMap, float4(v.texcoord.xy, 0, 0)).r * _HeightScale;
v.vertex.y += offset;
}
|
- 我们修改地形高度,实际上是根据高度贴图做顶点偏移,采样高度图的数据后位移顶点的y坐标即可
- tex2Dlod: 在顶点着色器中进行纹理采样需要使用这个方法,四个参数分别是(uv.x,uv.y,ignore,lod)
1
2
3
4
5
6
7
8
| #pragma target 4.6
#pragma surface surf Standard vertex:vert tessellate:tess
float _TessellationAmount;
float tess()
{
return _TessellationAmount;
}
|
- surface surf Standard 因为地形的材质要考虑光照阴影等,我们引入表面着色器简化流程
- tessellate:tess 是使用表面细分,因为我们在顶点着色器中进行了顶点偏移,如果原始的面数比较小,会产生棱角分明的情况,所以需要开启表面细分,GPU会在渲染时自动把每个大三角形细分成多个小三角形,再对新顶点应用相同的偏移,从而产生平滑、连续的地形起伏
1
2
3
4
5
6
7
8
9
10
11
12
13
14
15
| void surf (Input IN, inout SurfaceOutputStandard o)
{
float height = tex2D(_HeightMap, IN.uv_MainTex).r;
fixed4 color = tex2D(_MainTex, IN.uv_MainTex) * lerp(_TrialColor, _Color, height);
o.Albedo = color.rgb;
o.Metallic = _Metallic;
o.Smoothness = _Glossiness;
o.Alpha = color.a;
float3 baseNormal = UnpackNormal(tex2D(_NormalMap, IN.uv_NormalMap));
float3 overlayNormal = UnpackNormal(tex2D(_OverlayNormalMap, IN.uv_OverlayNormalMap));
float mask = tex2D(_OverlayNormalMap, IN.uv_OverlayNormalMap).a;
o.Normal = normalize(lerp(baseNormal, overlayNormal, mask));
}
|
- lerp(_TrialColor, _Color, height) 可以根据高度插值凹陷部分和原始部分的颜色,让颜色过渡更平滑
- lerp(baseNormal, overlayNormal, mask) 地形法线和脚印法线混合的时候都是先解码,使用传递过来的脚印透明度值进行插值,获取叠加脚印后的法线值
完结撒花~