阴影扰动效果(URP阴影渲染)
比较简单普适的阴影效果实现思路
URP阴影渲染流程
Github源码传送门————>ShadowEdgeDistortion
Bilibili教程传送门————>小祥带你实现阴影扰动效果
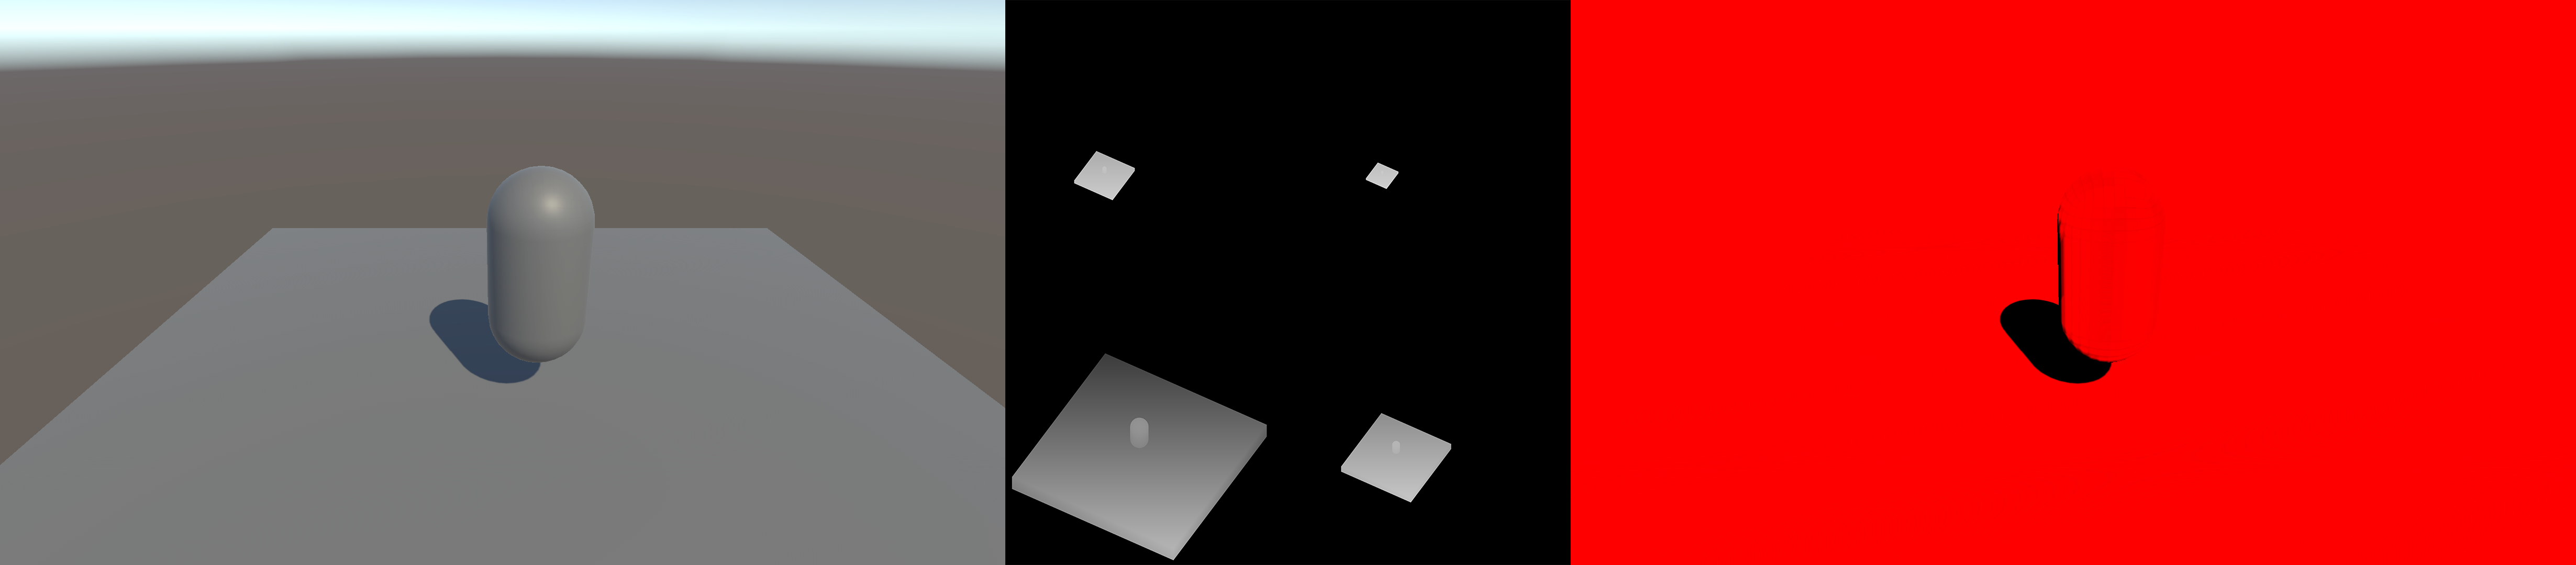
以官方URP中的SampleLit材质+平行光源(Directional Light)为例,过一遍阴影渲染流程
- ShadowCaster
1
2
3
4
5
6
7
8
9
10
11
12
13
14
15
16
17
18
19
20
21
22
23
24
Pass
{
Name "ShadowCaster"
Tags
{
"LightMode" = "ShadowCaster"
}
// -------------------------------------
// Render State Commands
ZWrite On
ZTest LEqual
ColorMask 0
Cull[_Cull]
HLSLPROGRAM
#pragma target 2.0
// -------------------------------------
// Shader Stages
#pragma vertex ShadowPassVertex
#pragma fragment ShadowPassFragment
ENDHLSL
}
- 投射阴影的物体执行这个Pass,将其从光源视角(平行光的话就是光照方向摆一个正交摄像机)下的深度信息写入阴影贴图(ShadowMap)
- 阴影贴图是例图中间那张,记录深度信息。可以看到包含四张不同分辨率贴图,这是因为引入了**级联阴影贴图(Cascaded Shadow Maps)**,保证不论远近阴影的质量比较稳定(近处的阴影更靠近相机,在屏幕上占的像素更多,稍有锯齿就很明显,使用较高分辨率的贴图;而远处阴影即使有锯齿,也在屏幕上占很少像素,不容易察觉,使用较低分辨率的贴图)
- ForwardLit
1
2
3
4
5
6
7
8
9
10
11
12
13
14
15
16
17
18
19
20
21
22
23
24
25
Pass
{
Name "ForwardLit"
Tags
{
"LightMode" = "UniversalForward"
}
// -------------------------------------
// Render State Commands
// Use same blending / depth states as Standard shader
Blend[_SrcBlend][_DstBlend], [_SrcBlendAlpha][_DstBlendAlpha]
ZWrite[_ZWrite]
Cull[_Cull]
AlphaToMask[_AlphaToMask]
HLSLPROGRAM
#pragma target 2.0
// -------------------------------------
// Shader Stages
#pragma vertex LitPassVertexSimple
#pragma fragment LitPassFragmentSimple
ENDHLSL
}
- 被投射阴影的物体在执行这个Pass的时候计算光照,阴影,环境光遮蔽等数据,将阴影绘制到物体上
- LitPassFragmentSimple
1
2
3
4
5
6
7
8
9
10
11
12
13
14
15
16
17
18
19
20
21
22
23
24
25
26
27
28
void LitPassFragmentSimple(
Varyings input
, out half4 outColor : SV_Target0
#ifdef _WRITE_RENDERING_LAYERS
, out float4 outRenderingLayers : SV_Target1
#endif
)
{
// ......
InputData inputData;
InitializeInputData(input, surfaceData.normalTS, inputData);
SETUP_DEBUG_TEXTURE_DATA(inputData, UNDO_TRANSFORM_TEX(input.uv, _BaseMap));
#if defined(_DBUFFER)
ApplyDecalToSurfaceData(input.positionCS, surfaceData, inputData);
#endif
InitializeBakedGIData(input, inputData);
half4 color = UniversalFragmentBlinnPhong(inputData, surfaceData);
color.rgb = MixFog(color.rgb, inputData.fogCoord);
color.a = OutputAlpha(color.a, IsSurfaceTypeTransparent(_Surface));
outColor = color;
// ......
}
- 可以看到在片元着色器中,初始化数据之后调用 BlinnPhong 光照模型对应的方法进行绘制
- UniversalFragmentBlinnPhong
1
2
3
4
5
6
7
8
9
10
11
12
13
half4 UniversalFragmentBlinnPhong(InputData inputData, SurfaceData surfaceData)
{
// ......
uint meshRenderingLayers = GetMeshRenderingLayer();
half4 shadowMask = CalculateShadowMask(inputData);
AmbientOcclusionFactor aoFactor = CreateAmbientOcclusionFactor(inputData, surfaceData);
Light mainLight = GetMainLight(inputData, shadowMask, aoFactor);
// ......
return CalculateFinalColor(lightingData, surfaceData.alpha);
}
- GetMainLight方法计算阴影和光照
- GetMainLight
1
2
3
4
5
6
7
8
9
10
11
12
13
14
15
16
17
18
19
Light GetMainLight(float4 shadowCoord)
{
Light light = GetMainLight();
light.shadowAttenuation = MainLightRealtimeShadow(shadowCoord);
return light;
}
Light GetMainLight(float4 shadowCoord, float3 positionWS, half4 shadowMask)
{
Light light = GetMainLight();
light.shadowAttenuation = MainLightShadow(shadowCoord, positionWS, shadowMask, _MainLightOcclusionProbes);
#if defined(_LIGHT_COOKIES)
real3 cookieColor = SampleMainLightCookie(positionWS);
light.color *= cookieColor;
#endif
return light;
}
- MainLightRealtimeShadow方法处理阴影
- MainLightRealtimeShadow
1
2
3
4
5
6
7
8
9
10
11
12
half MainLightRealtimeShadow(float4 shadowCoord, half4 shadowParams, ShadowSamplingData shadowSamplingData)
{
#if !defined(MAIN_LIGHT_CALCULATE_SHADOWS)
return half(1.0);
#endif
#if defined(_MAIN_LIGHT_SHADOWS_SCREEN) && !defined(_SURFACE_TYPE_TRANSPARENT)
return SampleScreenSpaceShadowmap(shadowCoord);
#else
return SampleShadowmap(TEXTURE2D_ARGS(_MainLightShadowmapTexture, sampler_LinearClampCompare), shadowCoord, shadowSamplingData, shadowParams, false);
#endif
}
- 这个方法是具体计算阴影的地方,可以看到有两种阴影采样路径
- 一种是屏幕空间阴影,提前渲染好一张屏幕阴影贴图(_ScreenSpaceShadowmapTexture),例图最右侧那张,渲染好的阴影贴图直接拿来采样使用即可,只做一次全屏计算,性能较好
- 一种是传统阴影计算路径,使用深度图(_MainLightShadowmapTexture),通过比较深度计算当前像素是否为阴影,每个片元都要采样,性能稍逊
阴影扰动效果
那么阴影渲染流程清楚之后,要对阴影做效果思路也比较清晰了,一种是去修改被投射阴影物体的主渲染Pass中渲染阴影的那一部分内容,一种是以屏幕空间阴影贴图为基础进一步操作。那么相比较而言显然是后者更易操作一些。我一向是喜欢使用非侵入式的实现方式的,在不改动原有实现的基础上去做效果最好,我愿称之为游戏开发糊弄第一准则XD。选好实现方式,具体的效果实现实际上就没什么难度了。比如要做阴影扰动效果,对UV进行扰动之后进行重采样即可,要做阴影外描边效果,边缘检测之后绘制描边即可。这里以扰动效果为例讲一下:
- ShadowDistortionRendererFeature
1
2
3
4
5
6
7
8
9
10
11
12
13
14
15
16
17
public class ShadowDistortionRendererFeature : ScriptableRendererFeature
{
public ShadowDistortionRenderPass shadowDistortionRenderPass;
public Material shadowDistortionMaterial;
public override void Create()
{
shadowDistortionRenderPass = new ShadowDistortionRenderPass(shadowDistortionMaterial);
shadowDistortionRenderPass.renderPassEvent = RenderPassEvent.BeforeRenderingOpaques;
}
public override void AddRenderPasses(ScriptableRenderer renderer, ref RenderingData renderingData)
{
renderer.EnqueuePass(shadowDistortionRenderPass);
}
}
- 屏幕空间阴影的渲染是在Gbuffer之后,阴影是在非透明物体阶段渲染的,那么我们的渲染顺序排在非透明物体渲染之前(BeforeRenderingOpaques)即可
- ShadowDistortionRenderPass
1
2
3
4
5
6
7
8
9
10
11
12
13
14
15
16
17
18
19
20
21
22
23
24
25
26
27
28
29
30
31
32
33
34
35
36
37
38
39
40
41
42
43
44
45
46
public class ShadowDistortionRenderPass : ScriptableRenderPass
{
private int shadowTexID;
private Material shadowDistortionMaterial;
class PassData
{
public Material material;
public TextureHandle target;
}
public ShadowDistortionRenderPass(Material material)
{
shadowTexID = Shader.PropertyToID("_ScreenSpaceShadowmapTexture");
shadowDistortionMaterial = material;
}
public override void RecordRenderGraph(RenderGraph renderGraph, ContextContainer frameData)
{
UniversalCameraData cameraData = frameData.Get<UniversalCameraData>();
var desc = cameraData.cameraTargetDescriptor;
desc.depthStencilFormat = GraphicsFormat.None;
desc.msaaSamples = 1;
desc.graphicsFormat = SystemInfo.IsFormatSupported(GraphicsFormat.R8_UNorm, GraphicsFormatUsage.Blend)
? GraphicsFormat.R8_UNorm
: GraphicsFormat.B8G8R8A8_UNorm;
TextureHandle color = UniversalRenderer.CreateRenderGraphTexture(renderGraph, desc, "_TempScreenSpaceShadowmapTexture", true);
using (var builder = renderGraph.AddRasterRenderPass<PassData>("ShadowDistortion", out var passData))
{
passData.material = shadowDistortionMaterial;
passData.target = color;
builder.SetRenderAttachment(color, 0, AccessFlags.Write);
builder.SetGlobalTextureAfterPass(color, shadowTexID);
builder.SetRenderFunc((PassData data, RasterGraphContext context) =>
{
Blitter.BlitTexture(context.cmd, data.target, Vector4.one, data.material, 0);
});
}
}
}
- 创建一张临时贴图,通过材质将屏幕空间阴影贴图进行处理,实现效果之后赋值到这张临时贴图,使用SetGlobalTextureAfterPass方法将我们的临时贴图设置为屏幕空间阴影,后续非透明物体渲染时采样的就是我们处理过的阴影贴图
- ShadowDistortion
1
2
3
4
5
6
7
8
9
10
11
12
13
14
15
16
17
18
19
20
21
22
23
24
25
26
27
28
29
30
31
32
33
34
35
36
37
38
39
40
41
42
43
44
45
46
47
48
49
50
51
52
53
54
55
56
57
58
59
60
Shader "Custom/ShadowDistortion"
{
Properties
{
_DistortionAmount("_DistortionAmount", Range(0, 5)) = 1.0
_PixelSize("_PixelSize", Float) = 200.0
}
SubShader
{
Tags { "RenderType"="Transparent" "Queue"="Transparent" "RenderPipeline"="UniversalPipeline" }
Blend SrcAlpha OneMinusSrcAlpha
Cull Off
ZWrite Off
Pass
{
Name "ShadowDistortion"
HLSLPROGRAM
#include "Packages/com.unity.render-pipelines.core/ShaderLibrary/Common.hlsl"
#include "Packages/com.unity.render-pipelines.core/ShaderLibrary/ImageBasedLighting.hlsl"
#include "Packages/com.unity.render-pipelines.universal/ShaderLibrary/Core.hlsl"
#include "Packages/com.unity.render-pipelines.core/Runtime/Utilities/Blit.hlsl"
#include "Packages/com.unity.render-pipelines.universal/ShaderLibrary/Shadows.hlsl"
#pragma vertex Vert
#pragma fragment Frag
float _DistortionAmount;
float _PixelSize;
float Noise(float2 uv)
{
return frac(sin(dot(uv * 1234.56 + _Time.y * 10, float2(12.9898, 78.233))) * 43758.5453) * 2 - 1;
}
float4 Frag(Varyings input) : SV_Target
{
float2 screenUV = GetNormalizedScreenSpaceUV(input.positionCS);
float time = _Time.y;
float2 distortedUV = screenUV;
distortedUV.x += sin(time * 10.0 + screenUV.y * 100.0) * 0.002 * _DistortionAmount;
distortedUV.y += Noise(screenUV * 10.0 + time * 3.0) * 0.002 * _DistortionAmount;
float2 pixelSize = float2(_PixelSize, _PixelSize);
distortedUV = floor(distortedUV * pixelSize) / pixelSize;
float pushAmount = (screenUV.x - 0.5) * 0.05 * _DistortionAmount;
distortedUV.x -= pushAmount;
half shadowMapDistorted = SAMPLE_TEXTURE2D(_ScreenSpaceShadowmapTexture, sampler_PointClamp, distortedUV);
return shadowMapDistorted;
}
ENDHLSL
}
}
}
- 我们操作的屏幕空间阴影贴图(_ScreenSpaceShadowmapTexture)是屏幕空间的
废话,使用GetNormalizedScreenSpaceUV方法将uv转到屏幕空间 - 简单做一个坐标扰动和像素化(其他效果类似),处理后的坐标去采样原贴图然后返回色值即可
完结撒花~
阴影扰动效果(URP阴影渲染)
https://baifabaiquan.cn/2025/07/16/ShadowDistortion/