局部曝光 & 双边滤波
Github源码传送门————>AutoExposure
Bilibili教程传送门————>小祥带你实现局部曝光
CMU双边滤波讲义传送门————>CMU双边滤波讲义
实现思路
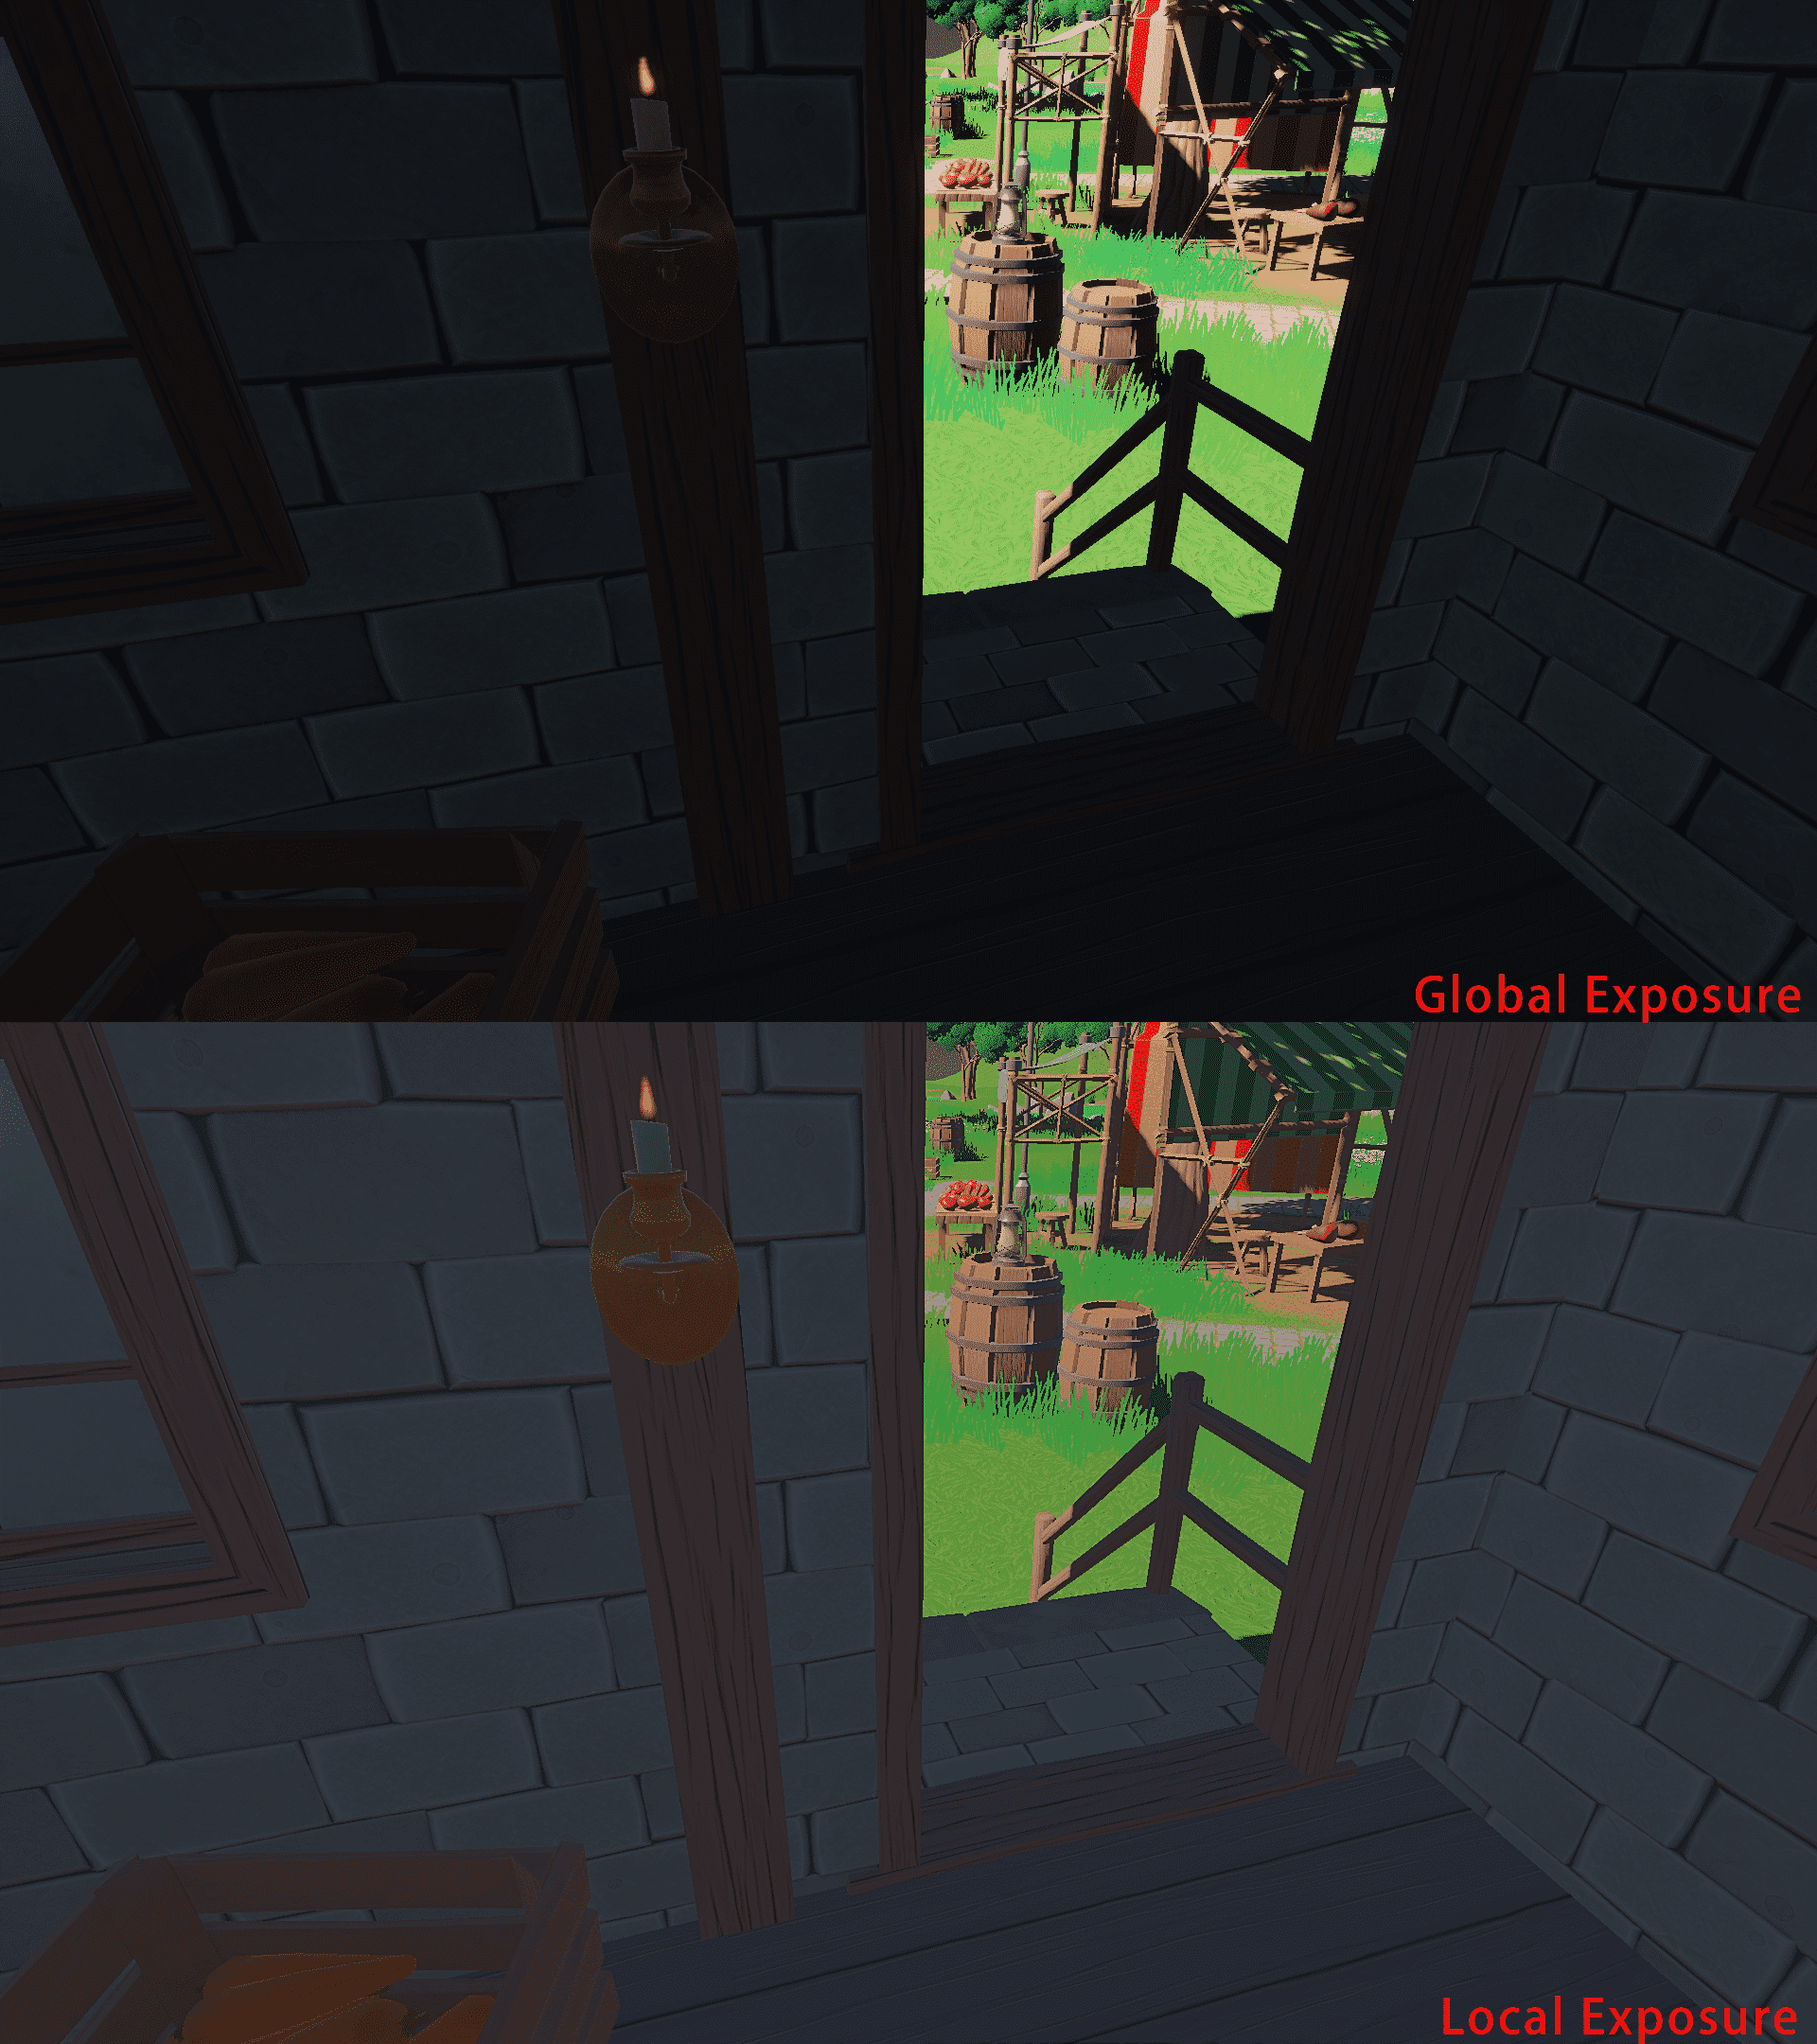
接上一节自动曝光,累积画面亮度和权重,计算一个加权平均亮度转为曝光系数应用到整个画面使其亮度处于合理区间,这个时候如果从室内看向窗外,室外的亮度值一般会非常高会拉高整个画面的亮度值,为了让画面整体亮度回归正常区间,计算出的曝光系数就会很小,这个时候室内比较暗的区域乘上这个很小的曝光系数使得暗部被压的更加暗导致细节丢失,所以这个曝光系数更准确的说是全局曝光系数,他的目标只是保证整体画面的亮度合理,出现一些比较极端的情况会导致亮部过曝或者暗部丢失细节,这个时候就需要微调局部曝光系数确保亮部和暗部的细节。还是以从室内看向窗外为例,在看向室内时整体亮度比较稳定,计算出的全局曝光系数和单个像素的曝光系数是比较接近的,但是镜头移向室外的过程中全局曝光系数急速变小,对比室内暗部的曝光系数差值也就非常大,那这个时候我们就知道当前全局曝光系数对于暗部像素而言太小了,需要给暗部的像素一些补偿,局部曝光的目的就是计算这个微调全局曝系数的局部曝光系数,思路大概就是这样,当然需要注意为了画面平滑还需要滤波降噪不能直接用像素亮度作为参数去计算曝光值。
BilateralBlur
1
2
3
4
5
6
7
8
9
10
11
12
13
14
15
16
17
18
19
20
21
22
23
24
25
26
27
28
29
30
31
32
33
34
| #pragma kernel BilateralBlur
[numthreads(NUMTHREAD_X, NUMTHREAD_Y, 1)]
void BilateralBlur(uint3 id : SV_DispatchThreadID)
{
float centerLuminance = _LogLuminance[id.xy];
int radius = 3;
float sigmaSpatial = 2.0;
float sigmaRange = 0.3;
float luminanceSum = 0.0;
float weightSum = 0.0;
for (int y = -radius; y <= radius; y++)
{
for (int x = -radius; x <= radius; x++)
{
int2 sampleCoord = int2(
clamp(id.x + x, 0, (int) _ScreenSize.x - 1),
clamp(id.y + y, 0, (int) _ScreenSize.y - 1)
);
float sampleLuminance = _LogLuminance[sampleCoord];
float weightSpatial = exp(-((x * x + y * y) / (2 * sigmaSpatial * sigmaSpatial)));
float weightRange = exp(-((sampleLuminance - centerLuminance) * (sampleLuminance - centerLuminance) / (2 * sigmaRange * sigmaRange)));
float weight = weightSpatial * weightRange;
luminanceSum += sampleLuminance * weight;
weightSum += weight;
}
}
_BilateralLogLuminance[id.xy] = luminanceSum / max(weightSum, 1e-5);
}
|
- 双边滤波在高斯滤波的基础上考虑了像素亮度差异
- weightSpatial空间高斯核,距离中心像素越近权重越大
- weightRange强度高斯核,距离中心像素亮度差越大权重越小,保证明暗边缘不会模糊
- 这里双边滤波的时间复杂度是O(n^2)级别的,可以通过BilateralGrid把图像映射到一个低维3D网格里做模糊从而将复杂度降低到O(n)级别
GaussianBlur
1
2
3
4
5
6
7
8
9
10
11
12
13
14
15
16
17
18
19
20
21
22
23
24
25
26
27
28
29
30
31
32
33
34
35
36
37
38
| #pragma kernel GaussianBlur
[numthreads(NUMTHREAD_X, NUMTHREAD_Y, 1)]
void GaussianBlur(uint3 id : SV_DispatchThreadID)
{
int radius = 3;
float sigma = 2.0;
float luminanceSumH = 0.0;
float weightSumH = 0.0;
for (int offsetX = -radius; offsetX <= radius; offsetX++)
{
int sampleX = clamp(id.x + offsetX, 0, (int) _ScreenSize.x - 1);
float sampleLuminance = _LogLuminance[int2(sampleX, id.y)];
float weight = exp(-(offsetX * offsetX) / (2.0 * sigma * sigma));
luminanceSumH += sampleLuminance * weight;
weightSumH += weight;
}
float horizontalBlur = luminanceSumH / max(weightSumH, 1e-5);
_GaussianTempBuffer[id.xy] = horizontalBlur;
float luminanceSumV = 0.0;
float weightSumV = 0.0;
for (int offsetY = -radius; offsetY <= radius; offsetY++)
{
int sampleY = clamp(id.y + offsetY, 0, (int) _ScreenSize.y - 1);
float sampleLuminance = _GaussianTempBuffer[int2(id.x, sampleY)];
float weight = exp(-(offsetY * offsetY) / (2.0 * sigma * sigma));
luminanceSumV += sampleLuminance * weight;
weightSumV += weight;
}
_GaussianLogLuminance[id.xy] = luminanceSumV / max(weightSumV, 1e-5);
}
|
- 通用高斯模糊,分成纵横两个方向去做,复杂度降低到O(n)
ApplyExposure
1
2
3
4
5
6
7
8
9
10
11
12
13
14
15
16
17
18
19
20
21
22
23
| #pragma kernel ApplyExposure
[numthreads(NUMTHREAD_X, NUMTHREAD_Y, 1)]
void ApplyExposure(uint3 id : SV_DispatchThreadID)
{
float3 color = _ScreenTexture[id.xy].rgb;
float globalExposure = _RWParameters[0].exposure;
float localExposure = 1;
#ifdef LOCAL_EXPOSURE
float bilateralLuminance = exp2(_BilateralLogLuminance[id.xy]);
float blurredLuminance = exp2(_GaussianLogLuminance[id.xy]);
float localLuminance = lerp(bilateralLuminance, blurredLuminance, _RParameters[0].blurredLumBlend);
float localEV = GetEV100(localLuminance);
float diffEV = localEV - _RWParameters[0].historyEV;
localExposure = pow(2.0, -diffEV * 0.5);
#endif
float3 finalColor = color * globalExposure * localExposure;
_ScreenTexture[id.xy] = float4(finalColor, 1.0);
}
|
- 双边滤波比较好地保留边缘,高斯滤波使得画面更平滑,这里添加一个系数blurredLumBlend平衡局部曝光效果
- 插值计算得到当前像素的亮度之后转为标准曝光值,减去上一帧曝光值得到曝光差值,这个差值越大说明需要补偿的强度越高,以这个差值为基础计算出当前像素的局部曝光系数
完结撒花~